Configuring Limit Login Attempts Settings in WordPress
Welcome to our tutorial for configuring Limit Login Attempts settings so that we can get this plugin working hard on your site in no time.
Limit Login Attempts is a WordPress plugin that does exactly what the name implies; limits the amount of fraudulent login attempts into the backend of your WordPress blog. WordPress by itself will give potential hackers unlimited attempts to gain access to your site. Eventually, a good hacker will succeed and cause you all sorts of grief. The Limit Login Attempts plugin corrects this issue, and provides a further step towards securing your blog from malicious activity.
I owned and operated a blog for several months before my first hacker broke in. After this nightmare occurred, Limit Login Attempts was one of the first plugins that I installed to help boost my WordPress security. I have been using this plugin for some time now, and it works extremely well. For this reason, we recommend installing Limit Login Attempts on your blog.
Thankfully, the Limit Login Attempts settings are very simple and works fairly well straight out of the box. However, I am extremely precautious when it comes to potential hackers getting into our site, so I tighten the reigns much further to prevent unwanted visitors from gaining access. For this reason, we are providing a short tutorial showing the exact Limit Login Attempts settings that we use on this blog.
If you have not already done so, you’ll first need to install this plugin in WordPress.
Hover your mouse over “Plugins” and click on “Add New” Plugins >> Add New
Type the plugin name into the search field provided.
Install and activate the plugin.
Once installed, go to Settings >> Limit Login Attempts
Limit Login Attempts Settings Page
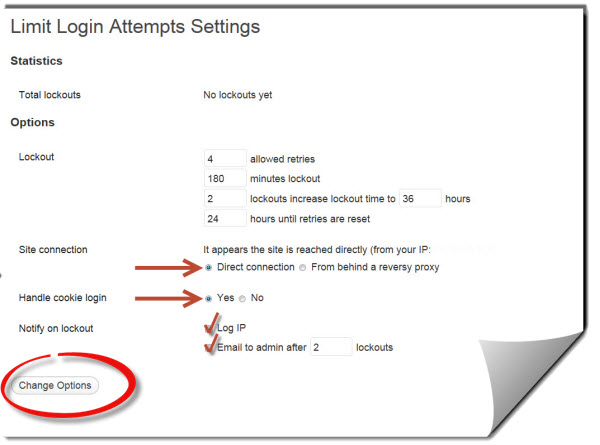
Below is a screenshot showing our exact Limit Login Attempts Settings:

We use these exact settings
Statistics
Total Lockouts:
- Once this plugin has had some time to work, this field will begin to show current lockouts.
Options
Lockout:
- We select “4 allowed retries”
***4 tries gives an actual user on your site chances to make a few mistakes before locking them out. However, if your password is strong, a hacker is not going to be successful with 4 attempts.
- We select “180 minutes lockout”
***After a potential hacker has made 4 attempts to login, they will not be able to try again for 3 hours. Hopefully, they will lose interest and not return.
- We select “2 lockouts increase lockout time to 36 hours”
***If the hacker returns after the original lockout period of 3 hours, and fails to login correctly for a second time, they will now be locked out for 36 hours.
- We select “24 hours until retries are reset”
Site connection:
The first line will give you the IP address for the computer that you are currently logged in on.
- We select “Direct Connection”
***In most cases, this selection will apply to you. If you do not even know what “From behind a reverse proxy” is, then this probably does not apply to you. Simply put, A reverse proxy is a server in between the site and the Internet (perhaps handling caching or load-balancing).
Handle cookie login:
- We select “Yes”
***This option allows you to select whether a lockout should be determined from the user’s IP address or cookies. We recommend that you select cookies, as IP addresses can be shared between multiple users.
Notify on lockout:
- We select “Log IP”
***When a user is locked out, the offending IP address will be recorded. This is helpful to determine if you have repeat offenders.
- We select “Email to admin after 2 lockouts”
***We like to be notified of anything going on with our blog.
Click on “Change Options”
We are done. The Limit Login Attempts settings are now configured and working on your blog. Now just sit back and watch as this plugin goes to work and the emails come storming in notifying you of malicious attempts to gain access to your blog. However, you must now be careful with your own login attempts. This plugin did lock me out of my site on one occasion, so it does happen. If this ever happens to you, just contact your hosting provider, and they should be able to get you back in.


3 Comments on "Configuring Limit Login Attempts Settings in WordPress"
Interesting and very useful.Thanks, Dave.Keep it up.
Dave, just finished configuring Limit Login Attempts.
Do you happen to know if I need to select “From behind a reversy proxy” as I am using CloudFlare. The plugin recommends that by default. What would you say?
Thanks
Hello Narender,
Thank you for writing in. Are you saying that the Limit Login Attempts plugin has automatically defaulted to this setting? If that is the case, I would stick with it. This plugin automatically detects your connection type. But either way, I don’t think that it will impact the plugin’s performance. I have been extremely happy with this plugin. I get a TON of hacker attempt’s and this plugin keeps every single one of them out.
Hope this helps!
Dave