Configuring Broken Link Checker Plugin Settings in WordPress
Welcome to our tutorial for configuring the Broken Link Checker plugin settings so that we can get this plugin working hard on your site in no time.
Broken Link Checker is a must-have WordPress plugin that works behind the scenes to ensure that links in posts, comments, and any other content that you specify are still intact and working properly as well as provide alerts when this plugin has found broken links or missing images. Without this plugin, bloggers would have no way of tracking and fixing possible link and image issues. You can’t fix something if you don’t know that there is a problem to begin with. This plugin takes the guess work out.
Installing and setting up Broken Link Checker is relatively simple, and we have provided a simple tutorial to walk you through the plugin settings. Just follow along step-by-step, and you’ll have this plugin working hard on your blog in minutes.
- Hover your mouse over plugins, and click on “Add New.”
- Type “Broken Link Checker” into the search field and hit enter.
- Install and activate the plugin.
Now navigate to the plugin’s settings page. Settings >> Link Checker
Broken Link Checker Plugin Settings
Once you are on the settings page, you’ll notice 5 tabs across the top. Make sure that you are on the “General Tab.” We’ll be making our way across as we go along.
General Tab
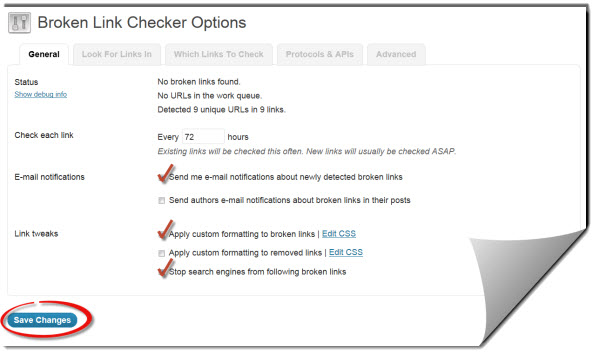
We use these exact settings.
Check each Link:
- We leave this defaulted to every 72 hours.
Email Notifications:
- We check the box “Send me e-mail notifications about newly detected broken links”
We like to be notified by email if broken links are found so that we can fix them immediately.
- We do not check the box “Send authors e-mail notifications about broken links in their posts”
However, this is personal preference. If you are a multi-author blog, this might be a good idea so that authors can fix issues with their own posts.
Link tweaks:
- We check the box “Apply custom formatting to broken links”
- We do not check the box “Apply custom formatting to removed links”
- We check the box “Stop search engines from following broken links”
Click on “Save Changes”
Click on the “Look For Links In” tab at the top.
Look For Links In Tab
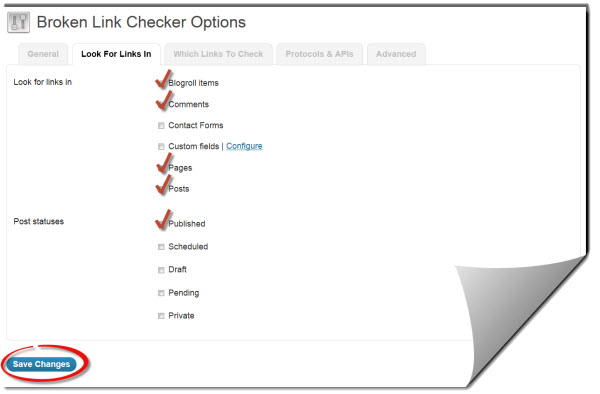
We use these exact settings.
These settings are really up to personal preference, but these are our settings:
Look for links in:
- We check “Blogroll items”
- We check “Comments”
- We do not check “Contact Forms”
- We do not check “Custom fields”
- We check “Pages”
- We check “Posts”
Post statuses:
- We check “Published
- We do not check “Scheduled”
- We do not check “Draft”
- We do not check “Pending”
- We do not check “Private”
Click on “Save Changes”
Click on the “Which Links To Check” Tab at the top.
Which Links To Check Tab
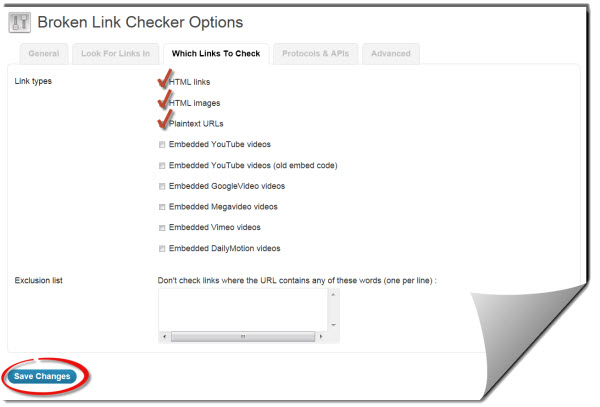
We use these exact settings.
Again, these settings are up to your personal preference and the type of content that you have on your blog.
Link types:
- We check “HTML links”
- We check “HTML images”
- We check “Plaintext URLs”
- We do not check “Embedded YouTube videos”
- We do not check “Embedded YouTube videos (old embed code)”
- We do not check “Embedded GoogleVideo videos”
- We do not check “Embedded Megavideo videos”
- We do not check “Embedded Vimeo videos”
- We do not check “Embedded DailyMotion videos”
We do not currently feature videos on BloggerGo, so these last 6 video options do not apply to us. If your blog features videos, then you will want to select the check boxes that apply to your blog.
Exclusion list:
- We do not use this feature.
Click on “Save Changes”
Click on the “Protocols & APIs” tab.
Protocols & APIs
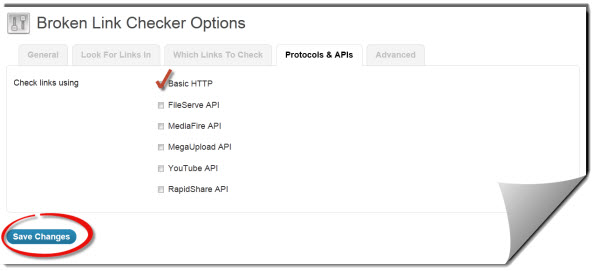
We use these exact settings.
Check links using:
- We check “Basic HTTP” This should be the default. This is the only setting that we use on this tab.
Click on “Save Changes”
Click on the “Advanced” tab.
Advanced Tab
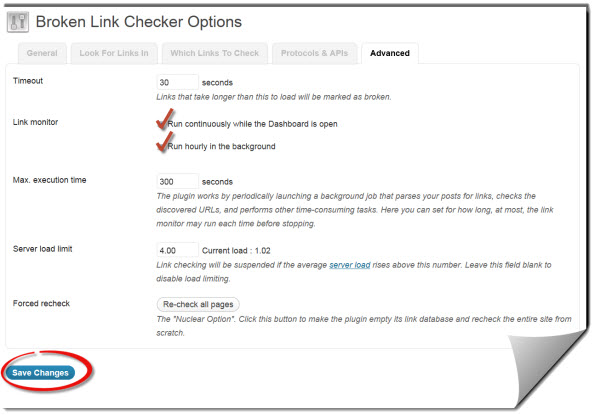
We use these exact settings.
This tab is easy. We use all of the default settings that were selected when the plugin was installed.
Done! You have now configured your Broken Link Checker plugin settings in WordPress. Now that this plugin is installed and setup, it will begin parsing your blog content. This will take anywhere from a few minutes to an hour depending on the size of your blog. Once the parsing process is completed, it will begin checking each and every link on your blog. If any links or images are broken, you’ll be notified.


2 Comments on "Configuring Broken Link Checker Plugin Settings in WordPress"
Hello Sir,
Thanks share informationGreat article for not only new bloggers but great tips to seasoned bloggers as well. Described in great length. Thanks for the post.
ThanK You.
Dave,It’s really helpful and needs more posts on WP concepts in future too.Thanks.