Starting a Blog Day 8 – Adding Categories & Uploading Posts
Welcome to day number 8 of starting a blog.
Yesterday was a full day of installing some useful WordPress plugins to add some additional functionality, including some security features, analytics as well as some tools to make blogging run more smoothly.
Today we are finally going to be uploading all of the posts that you have written and saved to your computer. Additionally, we are going to create and add your categories into WordPress so that when you upload your posts, you already have established topics set up to categorize them.
But first, it is time to write. Write another blog post to have in your arsenal when your blog launches in two days. As I have said time and time again, content is King and you might as well have a head start on some good quality content.
After you have written your blog post for the day, let’s go ahead and add some categories in WordPress if you have not already done so. If this is still on your to-do list, let’s go ahead and take care of that now. If you have already gone through this process, go ahead and scroll down to the next section where we start to discuss uploading your blog posts.
Adding Your Blogging Categories
 Hover your mouse over “Posts” and click on “Categories”
Posts >> Categories
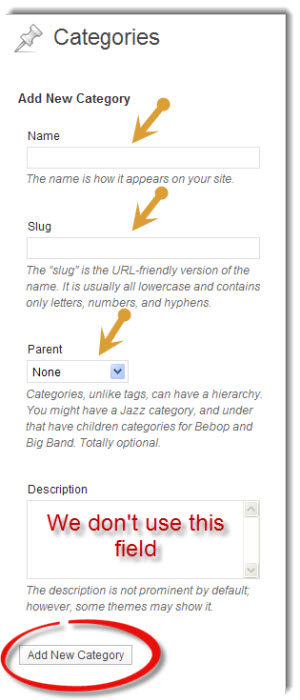
You’ll see the following settings page. Adding categories is pretty self-explanatory, but to avoid any confusion, let’s go through this step-by-step.
Name:
Enter the name of your category. Depending on the structure of your theme, this category name will be displayed exactly as you type it here. So choose your uppercase and lowercase letters wisely.
Slug:
This is the name that becomes apart of your url. If your category name is more than one word, separate each word with a hyphen. Use all lowercase letters for your slug. For example:
- this-is-a-category-slug
Parent:
This is where you will elect if a category is a subcategory or not. If you are adding a subcategory, you’ll first need to add the parent category so that it is populated in this dropdown list.
Description:
You’ll notice in our screenshot that we do not use this field. There are some themes that will display this information. However, I have never had a theme that did, so I don’t believe that this is very common. If you happen to know that your theme will display this information, you might think about adding a short description of your category. But this is not a big deal.
Click on the “Add New Category” button.
Go through this same process for each and every category that you are adding.
When you are done, it is time to upload your already written posts. Keep in mind that we are not going to publish them, but they will be saved as drafts in your WordPress dashboard.
Uploading Your Blog Posts
Hover your mouse over “Posts” and click on “Add New”
Posts >> Add New
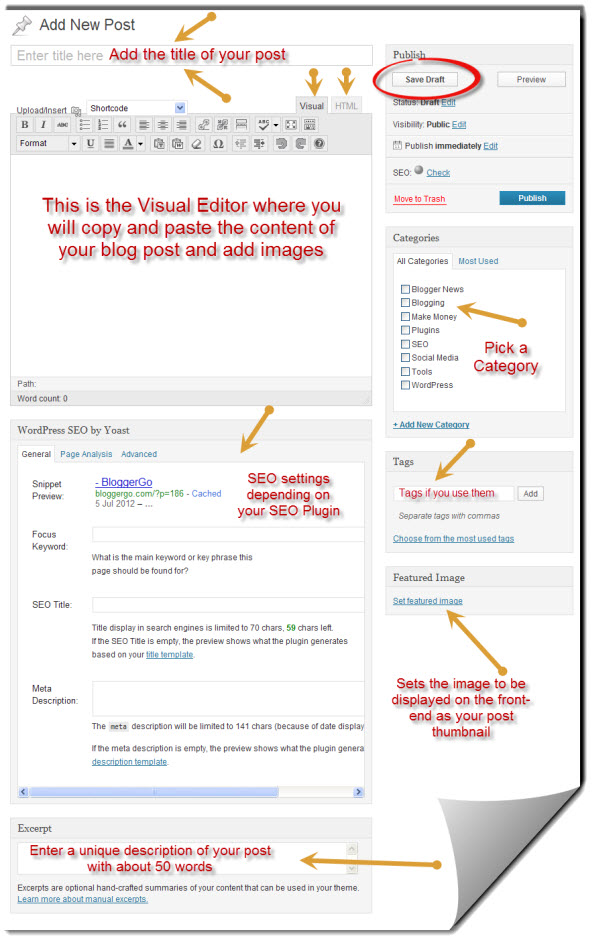
Below is a screen shot of your post editor screen.

You’ll notice that the post editor screen has two columns. Please follow along as I start with the left-hand column and work my way down the page.
The first field that you’ll notice is the “Enter title here” Enter your title exactly as it should be displayed on your blog.
Below that is the visual post editor. This is where the meat of your content will be placed. You’ll notice all of the WYSIWYG (what you see if what you get) buttons very similar to Microsoft Word. Play around with these to add some personality to your posts.
You’ll also notice the tabs titled “Visual” and “HTML”. Most of the time, you will use the Visual (WYSIWYG) tab. However, if you need to play around with the HTML version of your post, you can toggle between the two when the need arises.
Down below the post editor, you’ll see your SEO plugin settings, depending on which SEO plugin you are using. You’ll notice that I use WordPress SEO by Yoast. But for new bloggers, I recommend the All in One SEO Pack due to its fewer and less complicated options.
Below your SEO settings should be the “Excerpt” field. I recommend filling this out for every post that you write. The information that you enter here places a unique description of your post on the front-end, and alleviates a duplicate content problem that a lot of bloggers experience. Write approximately 50 words to grab the attention of your reader.
Now scroll back to the top, and we will now take a look at the right-hand column.
The first box that you’ll notice is the “Publish” settings. Scroll past that to “Categories”
Add the appropriate category that your post will be published under.
The next field is “Tags”
If you choose to use tags, enter 4-6 of them here. Don’t go overboard.
I might add that we do not bother with tags on this blog. In my professional opinion, tags are a waste of time and effort. But that choice is up to you.
The next field is “Featured Image”
This will give you the ability to choose the image that you want displayed as your post thumbnail in the frontend of your blog. By default, WordPress will grab the first image in a post and display that as the post thumbnail. If you wish to display another image on the front-end, setting the featured image will do the trick.
Once you have filled in every field, check your post for grammar and spelling mistakes. Every single blog post will send off an impression to your readers. Professionalism is a must.
Up at the top on the left-hand side, you’ll notice the “Save Draft” and “Preview” buttons. The preview button will open your post in a new window and display it exactly as it will appear when you publish it. It is always a good idea to use this preview button several times to fix any formatting issues or anything else that needs modifying.
At this point, you are only going to save the draft. Since your blog is not live yet, all of your posts will be saved as drafts. When your blog launches, then you will be clicking the blue “Publish” button.
Repeat this process for every blog post that you have written and saved thus far.
This concludes day 8 of starting a blog. Congratulations and keep moving forward. I promise, there is an end in sight and your successful launch is only 2 days away. Hang in there, take a good long rest tonight, and we will catch up with you tomorrow for day 9.


